Creating art can be a soothing experience, especially when it involves something as magical as Rainbow Salt Painting Jellyfish. The gentle act of layering colors and textures evokes a calming sense of playfulness. As the vibrant hues blend together, there’s a tactile delight in the way the salt glistens, reminiscent of sunlight dancing on ocean waves. Engaging in this art encourages mindfulness, allowing us to slow down and embrace the moment. Exploring a project that combines beautiful visuals with the therapeutic properties of salt can make crafting a truly immersive experience. If you’re looking for a gentle, sensory-rich project, the Rainbow Salt Painting Jellyfish is a wonderful choice, blending aesthetics with a satisfying creative process. You may also find Baking Soda Rainbow Crystal Forest Rainbow Crystals useful.
The Heart Behind This DIY
This project resonates deeply with those who find joy in creating. The tactile elements of salt and watercolor combine to evoke pleasant memories and sensory experiences, transporting you to serene beaches and vibrant ocean life. Salt painting itself is a captivating method that highlights the interplay between color and texture, making it delightful for both children and adults. It helps cultivate focus, allowing you to become absorbed in the rhythm of the process. As you paint and watch the colors spread, there’s a therapeutic quality that encourages relaxation and a deeper connection to your surroundings. You may also find Baking Soda Rainbow Crystal Forest Recipe useful.

A Gentle Look at the Process
Before diving into materials and steps, it’s worthwhile to reflect on how this project flows. The process of making Rainbow Salt Painting Jellyfish is gentle and rhythmic. You start with simple actions, pouring and mixing, then move on to precise applications of salt and watercolors. You might find the sound of salt pouring soothing, like grains of sand slipping through fingers. The visual transformation as watercolors spread and mingle brings a sense of satisfaction. Each stroke feels intentional, offering you the chance to be both playful and mindful throughout the entire endeavor. You may also find Baking Soda Rainbow Crystal Forest useful.
Materials You’ll Need
- Heavyweight watercolor paper
- Fine table salt (easy to find)
- Watercolor paints or liquid watercolors
- Paintbrushes (various sizes)
- A container for mixing watercolors
- Water
- Optional: spray bottle for creating textures
- Optional: cardboard or plastic sheets to protect work surfaces
Step-by-Step Directions
Start by preparing your workspace. Lay down some newspaper or plastic sheets to protect the surface. This creates a calming environment, allowing you to focus on your creation. You may also find Diy Rainbow Density Jar useful.
Cut your watercolor paper into a jellyfish shape. This step is simple yet satisfying, and you might enjoy tracing around fun jellyfish templates available online.
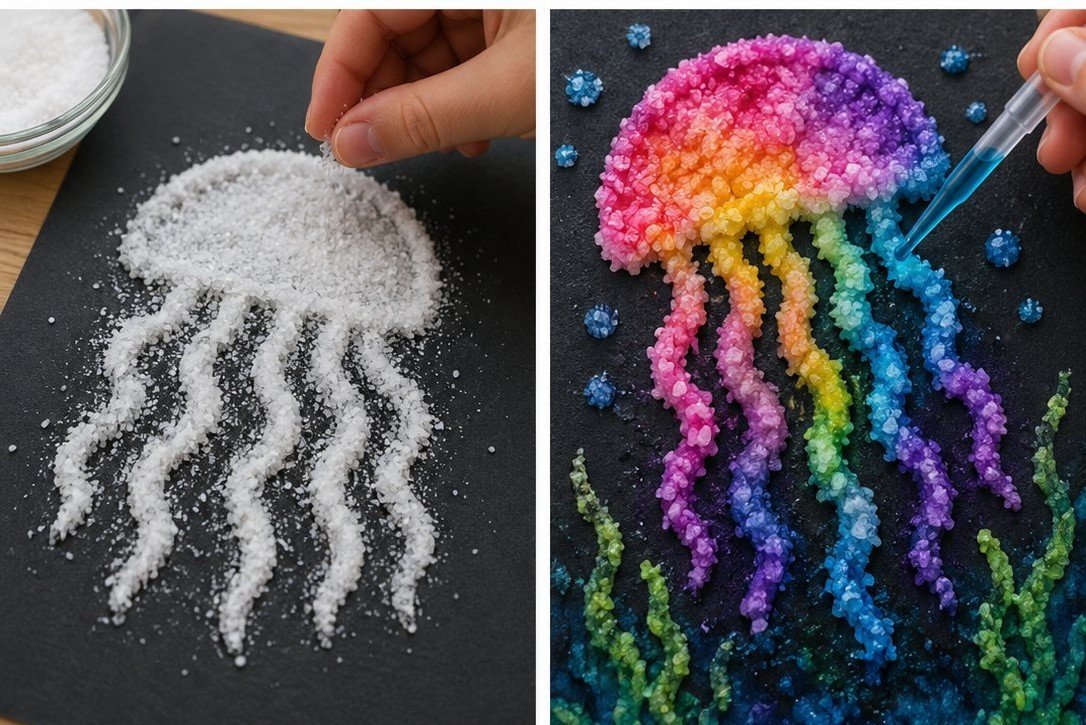
Once you have your jellyfish cut out, sprinkle a generous layer of salt over the entire surface of the paper. This tactile moment is essential as it enhances the overall effect of your watercolor.
In a separate container, mix your watercolors with water to achieve your desired consistency. Try to create a flowy texture that will spread easily over the salt.
Starting with one color, use your paintbrush to apply the watercolor to the salt-covered paper. Notice how the colors run and mingle, creating beautiful patterns. Allow each color a moment to interact with the salt before adding another.
Consider adding textures by spraying water gently from a spray bottle. This technique encourages the colors to move and blend more freely, mimicking an underwater scene.
Once you’re happy with your design, let your jellyfish dry completely. This could take a few hours, and the anticipation builds a lovely sense of completion.
When the jellyfish is dry, gently shake off any excess salt. You’ll be left with a vibrant piece of art that showcases the beautiful colors and textures you’ve created.
Using Rainbow Salt Painting Jellyfish in Everyday Life
After your jellyfish has dried and any excess salt has been shaken off, consider how it can be displayed. You might frame it and hang it in your living space, allowing your creation to brighten your environment. Alternatively, it can serve as a beautiful addition to a calm corner of your home, where it complements other mindful practices. Share your jellyfish art with loved ones, or use it as a gift that embodies creativity and mindfulness. This project becomes not just about the final product but also about the delightful experience you created along the way.
How to Store or Reuse Rainbow Salt Painting Jellyfish
Proper care ensures your jellyfish lasts, allowing you to enjoy it for years to come. Store your artwork in a cool, dry place, away from direct sunlight to prevent fading. If you’re concerned about any excess salt affecting the artwork over time, consider gently sealing it in a picture frame or displaying it under glass. This protects the integrity of the colors while maintaining the tactile beauty of the salt. Your jellyfish can also inspire future creations, sparking ideas for themed projects or similar crafts that engage your senses.
Gentle Tips & Variations
- Experiment with different colors or create multiple jellyfish in varying sizes. Feel free to mix hues to create your unique palette.
- Try using iridescent or metallic watercolors for a mesmerizing effect that catches the light beautifully.
- Instead of a jellyfish, use the same technique to create other sea-inspired creatures like octopuses or sea turtles. Each variation can help expand the world you’re crafting.
- Encourage others to join in! Engaging in a group setting not only fosters creativity but also creates shared moments of mindfulness.
FAQs About Rainbow Salt Painting Jellyfish
What age is this project suitable for?
This project suits a wide age range. Younger children may need assistance, while older kids and teens can explore the techniques independently.
Can I use regular salt?
Yes, regular table salt works perfectly for this project. It gives great texture and carries the watercolor beautifully.
How long does it take to dry?
Drying time varies depending on environmental conditions but typically takes a few hours. Patience is key in this waiting period.
What if I don’t have watercolor paints?
You can use liquid food coloring mixed with water as a substitute. This produces a similar effect and is a fun way to experiment.
Conclusion
Creating the Rainbow Salt Painting Jellyfish can be a transformative experience that fosters mindfulness and creativity. As you indulge in this calming art, consider exploring additional craft ideas, such as the Salt Painting Jellyfish craft activity guide, to inspire your next project. Allow yourself to fully embrace the serene journey of making while enjoying the vibrant outcome of your efforts.